Piper 1v2 3D Printer Build Log – Introduction and Goals
Piper 1v2 Build Introduction – Goals
Welcome to Snaphwhole.com Piper 1v2 Build Log
I currently have a Monoprice Mini-Delta and a Monoprice Maker Pro Mk.1
I am very happy with both, but wanted to build my own 3d Printer/CNC machine to learn more about how they work
I looked at just about every 3d printer/CNC machine on thingiverse.com, and finally chose the Piper 1v2 to build for a 3d printer, and MPCNC Mini and MPCNC for CNC machines – and to use them for experiments
I will do build logs for both systems – https://www.snapwhole.com/index.php/cnc-projects/
Some of the reasons I chose the Piper 1v2:
½ conduit Frame – locally sourced, inexpensive, easily replaced
Mostly Printer – The rest of the Frame was easily printed
Size – All the parts but 2 could be printed on the Mini-Delta
Size- Pick your size! Start small and go big
Expandable – printed parts reusable – just cut long conduit pieces
Expandable – increase X – cut new conduit, get a new belt, reprogram
Expandable – increase Y – cut new conduit, get a new belt and build plate, reprogram
Expandable – increase Z – cut new conduit, get new lead screws, reprogram
Lead Screw – Can use traditional T8 Lead Screw, or can be 5/16 or 3/8 threaded rod
Extruder – Multiple options – either create new or find on thingiverse.com
Extruder – Dual extruder possible
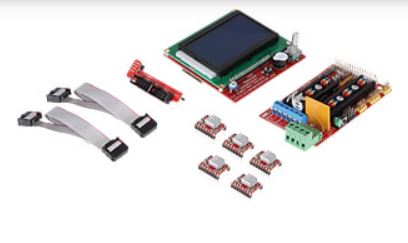
Control – Arduino
Control – Ramps board
Control – Stepper Drivers/MOSFETs
Software – Marlin etc
Bed – Start without heat and add later
Leveling – Auto/manual
Lots of choices – My Choices:
Lead Screw – 3/8 Inch Threaded Rod
Size – X-Y-Z – 200x300x200 – 8x12x8
Extruder – E3Dv6 with Bowden Tube
Extruder – add a dual E3Dv6 later
Bed – Heated Bed under glass
Leveling – Manual
Software – Marlin
Piper 1v2 3D Printer Build Log – Introduction and Goals
![]()